Premiere Proxies
Just show me the code
We all know about Premieres particular need for proxies.
They have to be:
-
Same aspect ratio as the original files
Otherwise you end up with stretched proxies, and no one likes that.
-
Same number of audio tracks as the original files
This doesn't make sense, but that's how it is.
-
Ideally same timecode
Because otherwise you're going to have headaches.
So you end up having to:
- Create proxies in Premiere and hope you have a nice 16x9 aspect ratio because that's what the default presets use.
- Realize you have media mixed between DCI 4k and UHD and now you gotta create an individual encoding preset
- Realize you have to create a Media Encoder encoding preset

If you ever had to do that at 2am you know that it works so badly it's not even funny. You create the preset and it tries to copy the files, or it can't import the preset into Premiere, or a thousand other weird things.
Then you decide to do just transcode everything in Davinci Resolve, which is probably what you should've done in the first place, but you still need to render everything in the same aspect ratio.
Let's fix that and hopefully come home early 
The code
Importing pydavinci
Assuming we have pydavinci installed and have a Davinci project open, let's create a premiere_proxies.py file and import and define the objects we're going to use.
from pydavinci import davinci

resolve = davinci.Resolve()

project = resolve.project
project_manager = resolve.project_manager
media_pool = resolve.media_pool
media_storage = resolve.media_storage
Tip
You can also programatically create a project. Check out Project
Setting up a folder to import to
Now let's create a folder on the media pool root folder, and set it as the current folder.
ocf_folder = media_pool.add_subfolder('OCF', media_pool.root_folder)
media_pool.set_current_folder(ocf_folder)
Info
OCF means Original Camera Format
Defining our function
Let's define our function to generate the Premiere proxies:
def generate_premiere_proxies(input_dir, proxyfactor, output_dir):
input_dir: a path to a folder containing all our mediaoutput_dir: output directory for our proxiesproxyfactor: by how much we will reduce the resolution for the proxies
Info
proxyfactor is the number to divide the original resolution to.
Example:
A proxyfactor of 1 on a 1920x1080 resolution will give you a 1920x1080 resolution proxy.
A proxyfactor of 1.5 on a 1920x1080 resolution will give you a 1280x720 resolution proxy.
A proxyfactor of 2 on a 1920x1080 resolution will give you a 960x540 resolution proxy
Importing Media
Now we can import the media in our project, and figure out what resolutions they are
def generate_premiere_proxies(input_dir, proxyfactor, output_dir):
    media_pool.import_media(input_dir)
    clips_res = defaultdict(list)

    for media in ocf_folder.clips:
            clips_res[media.properties['Resolution']].append(media)
We first import our media using the media_pool.import_media() method, which imports all valid(as judged by Resolve) media files from input_dir into the media pool on our current folder. We then create a defaultdict that we will use to store all resolutions from the media.
Then we loop for each MediaPoolItem in the ocf_folder.clips to grab each clip resolution, and store it in the clips_res dictionary which will end up looking like this:
clips_res = {
    '1920x1080': [MediaPoolItem1, MediaPoolItem2],
    '3840x2160': [MediaPoolItem3, MediaPoolItem4],
    ...
}
Tip
We're using a defaultdict to simplify our loop. If we used a regular dict, the first time we find a resolution we would have to first initiate it with a list value and then append to it. This way we don't need to check if we've seen this resolution before or not.
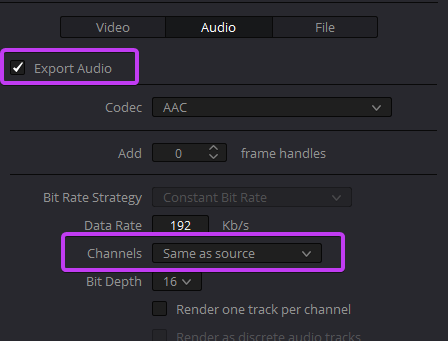
Now while the Resolve API is very powerful, it still lacks a way for us to set the default behavior of exporting audio channels to Same as Source, which is what we need for Premiere.. So now let's head to Davinci and create and save a render preset with that option enabled.
Proxies_PresetNow that we created our preset, let's make sure it's activated when we render the clips by using the project.set_preset() method.
def generate_premiere_proxies(input_dir, output_dir, proxyfactor):

    ...

    project.set_preset("Proxy_Preset")
We've imported and grabbed all clips resolutions, and now we can start our main loop.
Creating render jobs
First let's create an empty list which will contain our render jobs, then start our main loop and create a folder for each resolution we have and move the correct clips to that folder.
def generate_premiere_proxies(input_dir, output_dir, proxyfactor):

    ...

 render_ids = []

    for key in clips_res.keys():

        res_x, res_y = key.split("x") # (1)

        res_folder = media_pool.add_subfolder(key, ocf_folder)
        clips = clips_res[key] # (2)

        media_pool.move_clips(clips, res_folder)
-
When we grab resolutions from DaVinci, they come as a string, eg:
"1920x1080". We split the resolution to get the width and height -
We create a new variable containing the list of
MediaPoolItems for our current resolution in the loop.
Make sure to click the buttons in the code above for more information
Now we need to create a timeline containing all our MediaPoolItems for the current resolution in the loop. We then activate that timeline and set the timeline resolution to be the same as the clip's resolutions, to avoid any letterboxing.
def generate_premiere_proxies(input_dir, output_dir, proxyfactor):

    ...

 render_ids = []

    for key in clips_res.keys():

        ...

        media_pool.create_timeline_from_clips(
        res_folder.name, # (1)
        res_folder.clips
        )

        timeline = project.timeline
        timeline.set_setting("useCustomSettings", "1") # (2)
        timeline.set_setting("timelineResolutionWidth", res_x)
        timeline.set_setting("timelineResolutionHeight", res_y)
-
This is for the created timeline name. We're using the Folder name from before, which is set to be a string representing the resolution.
-
This allows us to set custom resolutions and framerates for timelines more easily through the Python API, without having to mess with the Project Settings.
For the next step, we need to set our render settings. Let's calculate our desired rendered resolution using our provided proxyfactor, set our render format/codec and output directory.
def generate_premiere_proxies(input_dir, output_dir, proxyfactor):

    ...

render_ids = []

    for key in clips_res.keys():

        ...

        project.set_render_format_and_codec("mp4", "H264")
        render_settings = {  # (1)
            "FormatWidth": (int(res_x) // proxyfactor), # (2)
            "FormatHeight": (int(res_y) // proxyfactor),
            "TargetDir": output_dir,
        }
        project.set_render_settings(render_settings)
-
The valid render settings that you can change are available at Project.set_render_settings()
-
The
\\floor operator ensures we get anintback and not afloat
Warning
If for any reason your render resolution ends up being an odd number, DaVinci will throw an error in the GUI and your script won't be able to continue.
Now we're almost done! Just add the current timeline and render settings to the render queue, and append it to our render_ids list
def generate_premiere_proxies(input_dir, output_dir, proxyfactor):

    ...

    render_ids = []

    for key in clips_res.keys():

        ...

        render_id = project.add_renderjob()
        render_ids.append(render_id)
    return render_ids
Render time!
Now we can get our job_ids and render them out!:
job_ids = generate_premiere_proxies(
    "Path/To/Folder/With/Clips",
    "Path/To/Output/Folder,
    proxyfactor=2,
    )

project.render(job_ids)
Resolve will start rendering all our timelines with our clips, and in the end we'll have proxies ready to be edited by Premiere.
Check out the full code here, with some extra functionality at the end which just prints out a nice message on render times left and total render time.